How to Transpose MIDI in Ableton Live | Explained
In music production, transposing MIDI (Musical Instrument Digital Interface) data is a powerful tool that opens up new creative possibilities and helps achieve desired musical results. Whether working with melodies, basslines, or intricate chord progressions, transposing MIDI can adjust the key for a vocalist’s range, match a sample’s tonality, or experiment with fresh ideas.
MIDI digitally represents musical notes, specifying pitch, velocity, and other parameters for virtual instruments and sequencers, allowing precise control in a DAW like Ableton Live. Transposing shifts the pitch of a musical piece up or down by a specific interval while maintaining the note relationships.
This article will explore various methods to transpose MIDI in Ableton Live, enhancing your music production workflow.
How Do You Transpose MIDI in Ableton Live?
Ableton Live offers several methods to transpose MIDI data, each with its advantages and use cases. Let’s explore three main approaches –
Transposing Within the Clip View (Manual Approach)
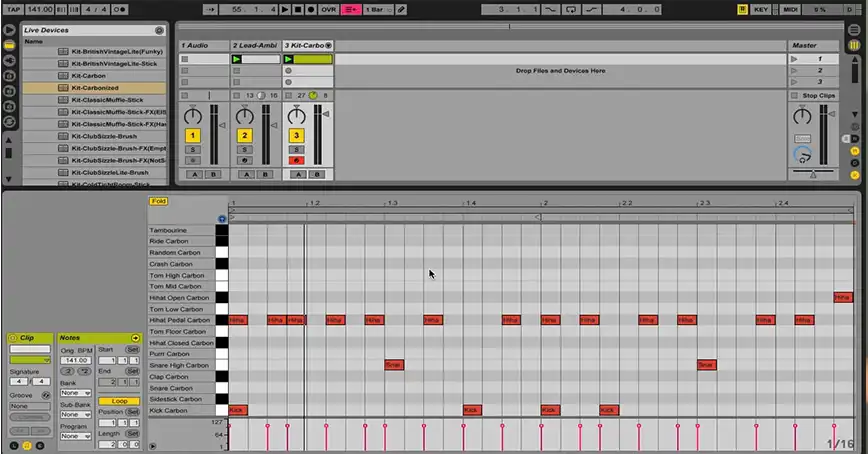
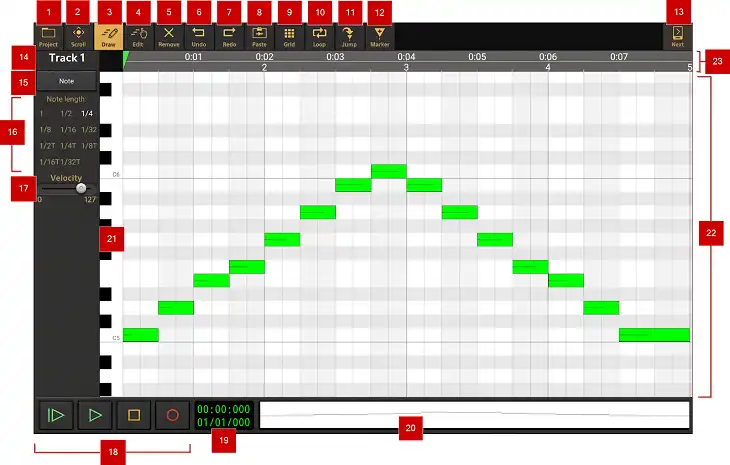
The Clip View in Ableton Live visually represents your MIDI notes, making it an intuitive environment for manual transposition. Here’s how you can transpose MIDI notes within the Clip View –
Step 1: Double-click a MIDI clip to open the piano roll, which displays MIDI notes on a grid.
Step 2: Select the MIDI notes you want to transpose. You can click and drag to select multiple notes or use keyboard shortcuts like Cmd/Ctrl + A to select all notes.
Step 3: Use the arrow keys to transpose the selected notes up or down –
- Up arrow key: Transposes notes up by 1 semitone each time you press it.
- Down arrow key: Transposes notes down by 1 semitone each time you press it.
For larger adjustments, hold the Shift key while using the arrow keys to transpose notes by 12 semitones (1 octave) at a time. Alternatively, hold Cmd/Ctrl while using the arrow keys for finer adjustments (smaller than 1 semitone).
Using the “Pitch” MIDI Effect (Automated Approach)
Ableton Live’s “Pitch” MIDI effect provides an automated approach to transposing MIDI data. Follow these steps –
Step 1: Open the Ableton Live browser and navigate to the Audio Effects section.
Step 2: Expand the MIDI Effects category and locate the “Pitch” effect.
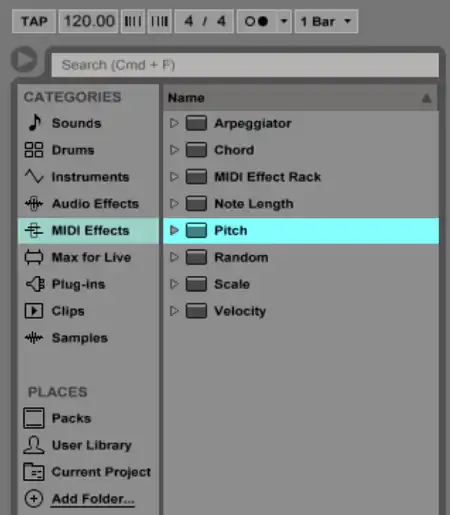
Step 3: Drag and drop the “Pitch” effect onto the desired MIDI channel in the track view.
Step 4: Adjust the semitone knob to transpose your MIDI data –
- Turning the knob clockwise increases the pitch (positive values).
- Turning the knob counter-clockwise decreases the pitch (negative values).
The “Pitch” effect is convenient for quick transpositions and subtle adjustments. However, it may be less precise for larger transpositions and can introduce slight artifacts depending on the sound source.
Transposing During Recording (Advanced Technique)
For those who prefer a more hands-on approach, Ableton Live lets you transpose MIDI real-time notes during recording. Here’s how –
Step 1: Hold the Shift key while recording MIDI notes on your MIDI controller or keyboard.
Step 2: Use the Up/Down arrow keys to transpose the MIDI data as you record.
This method requires good hand-eye coordination and familiarity with the keyboard shortcuts. It can be challenging to achieve precise transpositions while focusing on playing the notes, but it can be a powerful technique for experienced users.
How to Choose the Right Transposing Method for MIDI in Ableton Live?
When deciding which transposition method to use, consider the following factors –
- For small adjustments, the Clip View or “Pitch” effect might be suitable. However, larger transpositions might benefit from the Clip View’s numerical input or the “Pitch” effect’s finer control.
- Transposing within the Clip View is ideal for individual clips, while the “Pitch” effect efficiently transposes multiple clips within the same channel.
- Some users prefer the visual feedback of the Clip View, while others might find the “Pitch” effect’s knob more intuitive.
What to Consider While Transposing MIDI?
While transposing MIDI in Ableton Live, keep the following considerations in mind –
When transposing chords or progressions, you might need to adjust other notes to ensure they remain musically harmonious. Some pre-configured instruments within Ableton Live’s Instrument Racks (e.g., Simpler, Sampler) might have a built-in transpose function accessible within the Instrument Rack’s chain list or device view.
This can be convenient for quick transposition adjustments without needing to modify individual MIDI clips, although the specific location and functionality of the transpose function may vary.
Pro Tips for Transposing MIDI Effectively
- You can transpose by ear to find a key that sounds good in your project, or you can transpose to a specific key by entering the desired key value in the Clip View’s “Notes” section.
- Before applying the transposition, preview the sound of the transposed notes to ensure it fits your musical vision. You can use the audition buttons within the Clip View or experiment with the “Pitch” effect in real time.
- Mastering keyboard shortcuts like those mentioned above can significantly speed up your workflow when working with MIDI.
Conclusion
Transposing MIDI in Ableton Live is a powerful technique that can unlock new creative possibilities and help you achieve the desired musical results. Whether you’re adjusting the key for a vocalist, matching the tonality of a sample, or exploring new musical ideas, Ableton Live offers several methods to transpose MIDI data, each with its strengths and use cases.
Remember that transposing is a non-destructive process for MIDI, allowing you to experiment freely without compromising the original sample quality. Embrace the creative potential of transposition, and don’t hesitate to explore different keys and pitch variations to discover fresh and inspiring musical directions.
Related FAQs
Can I transpose multiple MIDI clips simultaneously in Ableton Live?
Yes, you can transpose multiple MIDI clips at once by using the “Pitch” MIDI effect on the corresponding MIDI channel. This efficient approach allows you to adjust the pitch of all clips within that channel simultaneously.
How do I transpose MIDI notes by specific key values in Ableton Live?
To transpose MIDI notes to a specific key, open the Clip View and look for the “Notes” section. Here, you can enter the desired key value (e.g., C, D#, F minor) to transpose your MIDI notes accordingly.
Can I automate transposition changes over time in Ableton Live?
Absolutely! You can automate the “Pitch” MIDI effect’s semitone knob to create dynamic transposition changes throughout your project. This allows you to create interesting pitch modulations and add more expression to your music.